The teeth and their supporting tissues are susceptible to infections by microorganisms found inside our mouths. These microbes have their effects around or within teeth. Endodontics, which literally means “within the teethâ€, is a dental specialty involved with the prevention, diagnosis and treatment of endodontic diseases. Endodontic treatment, which is often referred to as root canal treatment, root canal procedure or root canal therapy, provides an effective means of saving a tooth that might otherwise require extraction.
What is a root canal treatment?
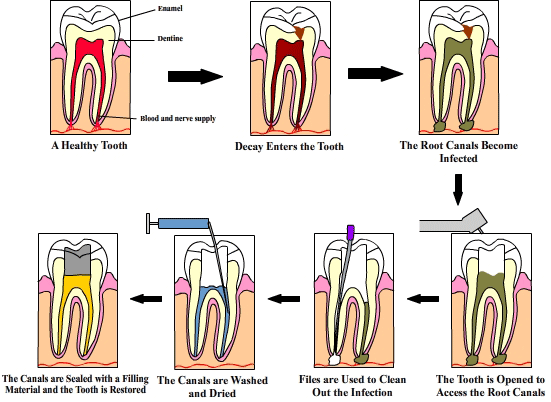
Root canal treatment (RCT) involves the removal of infected root canal and pulp tissues as well as cleaning and filling of the resultant space, in order to prevent microorganisms from multiplying within the root canal system and spreading to the gum tissues. Simple RCT can be performed by a regular dentist but complex cases are handled by a root canal specialist or also known as an endodontist.
Why root canal treatment is done
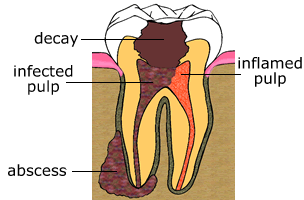
RCT is done when the pulp is exposed to the outside environment due to tooth decay or trauma and has been irreversibly damaged or dead and/or when there is evidence of apical periodontitis or abscess. RCT may also be necessary when you require a crown, bridge or an overdenture.
How do confirm root canal treatment is needed
Before RCT is carried out, examination of the patient is done with evaluation of the symptoms or problems described by the patient which include description of the location, intensity and duration of pain. Medical and dental histories, radiographs, clinical examination and pulp vitality tests are completed to diagnose the problem experienced by the patient.
Examination of tooth involved
1.      Palpation test – firm pressure is applied to the mucosa above the apex of the root
2.      Mobility test – excessive mobility may be due to loss of attachment as a result from periodontal disease or inflamed periodontal ligament from pulpitis or occlusal trauma
3.      Percussion test – tapping on the incisal or occlusal surface with a mouth mirror handle to determine whether inflammation has extended into tissues around the root
4.      Periodontal probing – a detailed periodontal examination is carried out
5.      Occlusal examination – any occlusal disturbances is noted
6.      Assessment of teeth – any signs of tooth decay, fractures or discoloration is noted
7.      Vitality testing – to check the health of the pulp. Tests include Cold test, Heat test and Electric pulp testing.
- If there are no signs and symptoms with tooth response normal to sensory stimuli, the pulp is normal.
- If decay is close to the pulp but has not penetrated it, the condition is termed reversible pulpitis. The dentist may place a sedative material in the tooth and wait to determine if the tooth will repair itself.
- If bacteria exist in the pulp, the condition is called irreversible puplitis and RCT is necessary.
- If tooth does not respond to sensory stimulus, the pulp is deemed necrotic or non-vital.
Assisting in root canal treatment
Equipment and supplies
Basic setup, local anesthesia agent setup (optional), dental dam setup, high speed handpiece with burs (dentist’s choice), low-speed handpiece with latch attachment, syringe with 27-gauge needle, endodontic spoon excavator, endodontic explorer, endodontic plugger, broaches and Hedstrom/K type files (assorted sizes and lengths), rubber instrument stops, paper points, gutta-percha points, endodontic sealer supplies, sodium hypochloride solution, saline solution, hemostat, millimeter ruler
Procedural steps
Anesthesia and pain control
1.      Assist in administration of the local anesthetic agent (if required).
Isolation and disinfection of operating field
2.      Assist with preparation and placement of the dental rubber dam (expose only tooth being treated).
3.      Swab antiseptic solution over exposed tooth, the clamp and the surrounding dental dam.
Accessing the tooth and removal of pulp
1.      The dentist enters the crown portion of the tooth with a tungsten carbide bur, removing decay and infected tooth structure.
2.      Once the root canals are located with the endodontic explorer, the pulp tissues are removed with a brooch.
3.      The canals are irrigated gently with the sodium hypochloride solution and saline solution.
4.      The dentist uses a small endodontic file to rub the irrigation solution against the walls of the canal and pulp chamber.
Cleaning and shaping the canal
1.      The dentist inserts files into the canal and moves them up and down with short strokes. During this motion, the cutting edges of the files remove dentin and debris from the walls.
2.      Take a periapical radiograph of the tooth with a trial file in the canal. This is the working length radiograph.
3.      Transfer larger files to the dentist to clean and shape the canals to enlarge the diameter of the canals.
4.      The rubber stop must be placed on the file at the desired working length for each canal.
5.      Irrigate the canals thoroughly at frequent intervals during this shaping and cleaning process to prevent dentin shavings from clogging the cutting edges.
6.      Transfer paper points for insertion into the canals until the points come out dry.
Preparing to fill the canal
1.      Select the appropriate-sized gutta-percha point, and cut it to the predetermined length. This is called the master cone.
2.      Take a periapical radiograph of the tooth with the master cone in the canal.
3.      If the radio does not show the tip of the point within 1mm of the apex of the root, the point is repositioned and another radio is taken.
Filling the canal
1.      At the signal from the dentist, prepare a thin mix of endodontic sealer on a sterile glass slab.
2.      The master cone is removed from the canal, coated with sealer and reinserted by the dentist.
3.      The dentist inserts the finger spreader into the canal within 1mm of the working length. The spreader is rotated counterclockwise to spread the sealer around the canal and create space for the other cones.
4.      Continue transferring gutta-percha points to fill the canal.
5.      Transfer an instrument heated at the working end to remove excess ends of the gutta-percha points.
6.      Transfer the endodontic plugger for the dentist to compact the points vertically.
7.      This routine continues until the canal is completely filled
8.      The dentist places a temporary restoration on the canal.
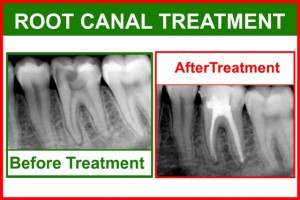
9.      Expose a post treatment radiograph.
10.  Dentist checks the occlusion of the temporary restoration and adjust as needed.
Post treatment instructions and follow-up
1.      Instruct the patient to call the practice immediately is there are indications of a problem, such as swelling or pain.
2.      Remind the patient that another visit is necessary to have a final restoration placed.
3.      Request that the patient return to the endodontist for follow-up around 3 to 6 months later to ensure the root canal treatment was a success and that no complications has developed.


Pingback: Apical Periodontitis: Symptoms and Treatment | Intelligent Dental
Pingback: The Dangers of Root Canal Treament | Intelligent Dental